HTTP Error 503. The Service is unavailable – SharePoint 2010

Note:  This Tutorial is based on SBS 2011 Server – Sharepoint 2010 and it will also work on Windows Server 2008.

Have you seen the HTTP Error 503 in your browser when you’re trying to access your SharePoint site?

Here are the possible resolutions:

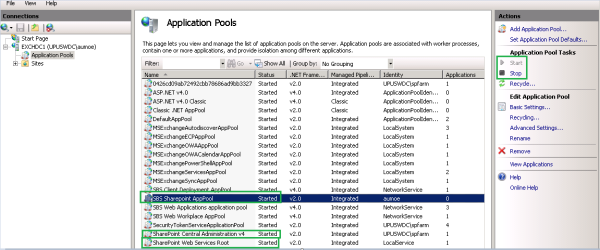
Option 1:  Make sure that all SBS Sharepoint application pools are “Started” and not “Stopped”.

To do this, locate Information Services (IIS) Manager (click on Start then Administrative Tools) from the Windows Server (SBS 2011 or 2008). Select Application Pools, then locate all SharePoint application pools, if they need to be Started, go to the Application Pool Tasks pane and select Start.
Application Pools - Services

If Option 1 didn’t help resolve the issue…… proceed to the next Option.

Option 2:  In the Application Pools Properties, select SBS Sharepoint AppPool, select Advanced Settings….

Error 503 pic1

In the Advanced Settings properties, go to Process Model, go to Identity and click on

Advanced Settings

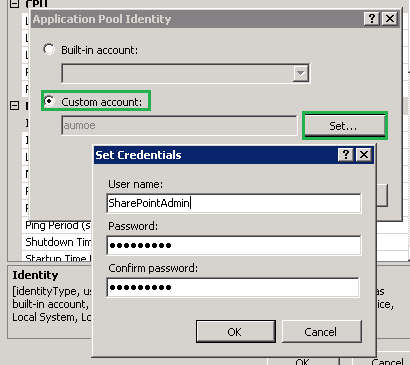
In the Application Pool Identity properties, go to Custom account then Set… then change the Username and Password.
Application Pool Identity

Now, try to access your SharePoint site on any browsers and see if error 503 has disappeared.


How to Allow or Block a Website or URL by using GPO in Windows Server 2008

Requirements: Windows Server 2003 R2 or above versions (Windows 2008 & Windows Server 2012) Domain Controller

In this Tutorial we will be using Windows Server 2008 server, the procedure that you are about to read will be similar to Windows Server 2003 R2 and Windows Server 2012.

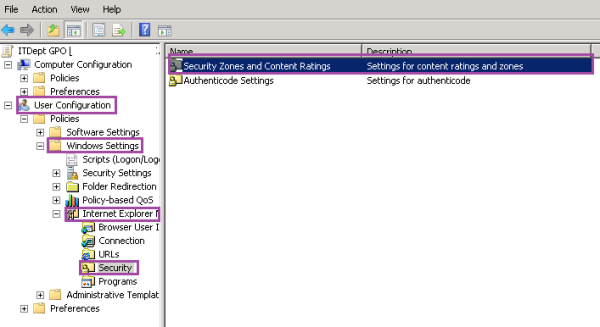
Open up the Group Policy Management Editor and locate the Organizational Unit (OU), expand User Configuration, expand Windows Settings, expand Internet Explorer then click on Security and double click Security Zones and Content Ratings.

gp-mgmt-editor
On the Security and Privacy Settings properties, under Content Ratings select Import the current Content Ratings settings, then click on Modify Settings then click OK.

Security Zones Content Ratings

On Content Advisor properties, click on Approved Sites tab, in Allow this website you may select Always, to Allow a website then click OK.

Allow site

Allow Website

or  choose Never to block a website then click OK.

Content Advisor pic1

Content Advisor

How to Restore a Backup using the Windows Server Backup feature in Windows Server 2008 Enterprise R2

Open up the Windows Server Backup (Click on Start and type backup, click on Windows Server Backup on the top).  Select Recover on the right navigation pane.

In the Getting Started page, select ‘A backup stored on another location’ and click on Next to continue.

In the Specify Location Type page, select Remote shared folder, you may wish to choose another location type and click on Next to continue.

In the Specify Remote Folder page type the Universal Naming Convention (UNC) to the remote folder then provide the credentials, click on Next to continue.

In the Select Server page, select which server’s data that you wish to recover, click on Next to continue.

In the Select Backup Date, select the backup date to be used for recovery and click on Next to continue.

In the Select Recovery Type select which want you wish to recover. In this Tutorial we’ll be selecting Files and folders and click Next to continue.

In the Select Items to Recovery page, locate the items that you wish to recover. In this Tutorial please click on Recovery and click on Next to continue.

In the Specify Recovery Options page, choose Another location, click on Browse and select the location, click on Next to continue.

In the Confirmation and final page of the recovery wizard, click on Recover, this conclude your backup restore.

Note: You may also use this Tutorial in SBS 2011.

Please check out How to use the Windows Server Backup in Windows Server 2008 Enterprise R2

How to use Windows Server 2008 Backup

To begin…..Make sure that Windows Server Backup server feature is installed. You may confirm this by going into the Server Manager and locate Features. If it’s not installed please follow this guide. Open up the Server Manager and click on Add Features and Run the Add Features Wizard to add the Windows Server Backup.

You will see this page when the Add Features Wizard has been successfully completed.

Open up the Windows Server Backup (Click on Start and type backup, click on Windows Server Backup on the top). Select the Backup Schedule on the right navigation pane.

In the Getting Started page, click on Next to continue.

In the Select Backup Configuration page, you may either select Full Server (recommended) or Custom, click on Next to continue.

In the Select Items for Backup page, you may select what you want to backup, click on Next to continue.

In the Specify Backup Time page, choose the appropriate backup – how often and what time you want your backup to start, click on Next to continue.

In the Specify the Destination Type page, choose the location where you want to store your backup, click on Next to continue. You may choose a remote backup and opt out to back up to an external hard drive, we will use a Network Attached Storage (NAS) device in this Tutorial, click on Next to continue.

In the Specify Remote Shared Folder page, type the location of the NAS, click on Next to continue.

You will have to provide the User Name and Password of the NAS or the remote backup location, click on Next to continue.

In the Confirmation page, click on Finish to conclude the backup wizard.

Note: You may also use this Tutorial in SBS 2011.

Please check out  How to Restore a Backup using the Windows Server Backup feature in Windows Server 2008 Enterprise R2