HTTP Error 503. The Service is unavailable – SharePoint 2010

Note:  This Tutorial is based on SBS 2011 Server – Sharepoint 2010 and it will also work on Windows Server 2008.

Have you seen the HTTP Error 503 in your browser when you’re trying to access your SharePoint site?

Here are the possible resolutions:

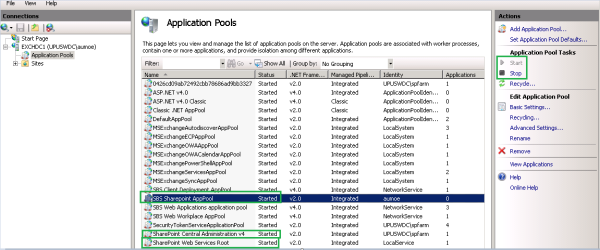
Option 1:  Make sure that all SBS Sharepoint application pools are “Started” and not “Stopped”.

To do this, locate Information Services (IIS) Manager (click on Start then Administrative Tools) from the Windows Server (SBS 2011 or 2008). Select Application Pools, then locate all SharePoint application pools, if they need to be Started, go to the Application Pool Tasks pane and select Start.

Application Pools - Services

If Option 1 didn’t help resolve the issue…… proceed to the next Option.

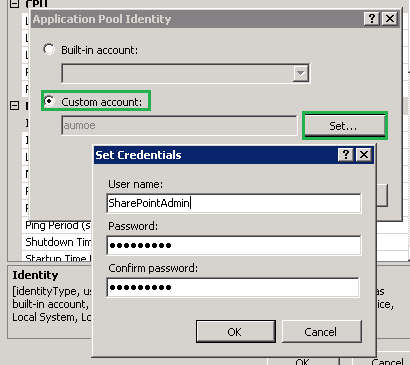
Option 2:  In the Application Pools Properties, select SBS Sharepoint AppPool, select Advanced Settings….

Error 503 pic1

In the Advanced Settings properties, go to Process Model, go to Identity and click on

Advanced Settings

In the Application Pool Identity properties, go to Custom account then Set… then change the Username and Password.

Application Pool Identity

Now, try to access your SharePoint site on any browsers and see if error 503 has disappeared.


Assigning User Permission in SharePoint 2010

If you are a Network Administrator in your company and would like to give a limited access or proper permission to the Intranet Users, I have prepared this Tutorial to walk you through the process of assigning the proper permission to the Users, whether you wish to grant a Full Control, Full Read, Deny Write, Deny All or a Customized permission.

To begin, open SharePoint 2010 Central Administration, click on Central Administration, click on Application Management then click on Manage web applications.

Central Administration

In the Web Applications Tab, click on the SharePoint site name (SBS SharePoint).

Web App Mgmnt

In the Web Applications Tab, click on the User Policy, then click on Add Users.

Web App Mgmnt 2

In the Add Users page, select the Zone, in this tutorial we will select Intranet, click on Next to Continue.

Add Users

In the Add Users page, type the Active Directory User that you wish to give the proper permission to, then click on Finish.

Add Users-Read Access

This concludes the Tutorial in Assigning User Permission in SharePoint 2010.

Note: You may to go back from the Policy for Web Application page to edit the User’s permission if needed.